有了前一章的框架,我们就可以开心的开发web应用了。下面我要做的是一个timeline,用户登陆后可以发表动态。
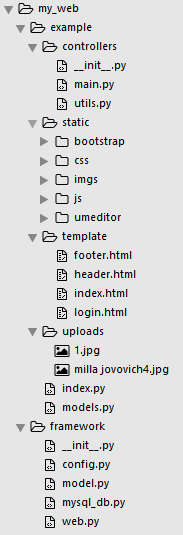
项目组织结构如图:
models.py
首先是定义实体:
class User(Model):
    __fields__ = ('username', 'password', 'joined_time')


class Post(Model):
    __fields__ = ('user_id', 'ref', 'content', 'publish_time')

    def getAuthor(self):
        return User.get(self.user_id)
注意: 数据库和表需要手动创建,sql语句如下:
create table user(
id int unsigned primary key auto_increment,
username char(20) not null unique,
password char(32) not null,
joined_time datetime default NOW()
);

create table post(
id int unsigned primary key auto_increment,
user_id int unsigned,
ref int unsigned null,
content text not null,
publish_time datetime default NOW(),
foreign key(user_id) references user(id),
foreign key(ref) references post(id)
);
__fields__省略了id字段,表明默认为实体名的小写,__database__默认为default,ref字段表示该条动态是所引用的动态。
数据库的配置在framework/config.py,如下:
# config database info
DATABASES = {
    'default': {
        'user': 'root',
        'password': '',
        'database': 'test'
    }
}
index.py
入口文件,该文件位于web应用的根目录,文件名不一定非得是index。
# coding=utf-8

#######################
# 入口文件
#######################
import sys,os,pdb
sys.path.append('../framework')

from web import app
import controllers.main

# start server at last
app.run()
将framework手动添加到python path中,然后引入控制器函数,从framework中引入app全局对象,最后启动它,端口默认为8888。也可以在入口文件中定义控制器函数,放在app.start()之前,比如
@route(r'/hello/(\w+)')
def say_hello(name):
    return 'Hello %s' % name
为了让各模块的功能更清晰,我们将控制器函数单独放在controllers包里。
controllers
所有的控制器函数都在main.py中,utils.py里是一些工具函数。
模板路径的配置
下面使用render函数的模板默认都保存在template文件夹中,所以对于主页indexhtml无需写成template/index.html,该配置同样在config中TEMPLATE_DIR='template'
main.py
0.使用static_file函数来serve静态文件
@route(r'/static/.*')
def static():
    return static_file(ctx.request.path_info[1:])
@route(r'/uploads/.*')
def static():
    return static_file(ctx.request.path_info[1:])
静态文件,比如js/css放在static目录中;通过编辑器上传的图片保存在uploads目录中。
1.登陆
@route(r'/login')
def login():
    if ctx.request.method == 'POST':
        name = ctx.request.post('username')
        pwd = md5(ctx.request.post('password'))
        user = User.filter_one('username=%s', name)
        if user:
            if user.password == pwd:
                ctx.response.set_cookie('user_id', user.id, 36000)
                raise Redirect(302, '/')
            else:
                return render('login.html', dict(error='密码错误'))
        else:
            return render('login.html', dict(error='用户名不存在'))
    elif ctx.request.method == 'GET':
        return render('login.html')
首先判断一下请求的方法,如果是get则显示登陆框,如果是post则是登陆。 用户的密码以明文的方式传输(不安全),并且是以md5加密的形式保存,防止泄露。 如果用户还未注册则要先注册。
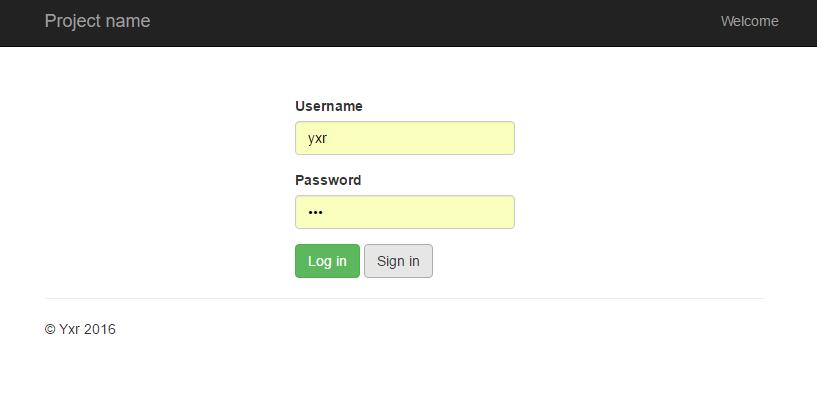
login.html
{% include header.html %}
    <div class="container">
      <div class="row">
        <div class="col-sm-offset-4 col-sm-4">
          <form style="margin-top: 50px" method="post">
            <div class="form-group">
              <label for="inputUsername" class="control-label">Username</label>
              <input type="text" class="form-control" id="inputUsername" name="username" placeholder="Username" required="required"></div>
            <div class="form-group">
              <label for="inputPassword" class="control-label">Password</label>
              <input type="password" class="form-control" id="inputPassword" name="password" placeholder="Password" required="required"></div>
            <div class="form-group has-error">
              <p class="help-block">{{error}}</p>
            </div>
            <button type="submit" class="btn btn-success" formaction="login">Log in</button>
            <button type="submit" class="btn btn-default" formaction="signin">Sign in</button>
          </form>
        </div>
      </div>
    </div>
{%include footer.html %}
注册和登陆使用同一个页面,请求的地址使用submit按钮的formaction进行区分。
通过模板引擎的include功能,我们将该页面分成了header、content、footer三个部分,使得header和footer可以复用。
header.html
<!DOCTYPE html>
<html lang="en">
  <head>
    <meta charset="utf-8">
    <meta name="viewport" content="width=device-width, initial-scale=1">
    <meta name="author" content="yxr">

    <title>web framework example</title>
    <link href="/static/bootstrap/bootstrap.min.css" rel="stylesheet">
    <style type="text/css">
    /* Move down content because we have a fixed navbar that is 50px tall */
    body {
      padding-top: 50px;
      padding-bottom: 20px;
    }
    </style>
    <script src="/static/js/jquery-1.12.0.js"></script>
  </head>

  <body>

    <nav class="navbar navbar-inverse navbar-fixed-top">
      <div class="container">
        <div class="navbar-header" style="float:left">
          <a class="navbar-brand" href="/">Project name</a>
        </div>
        <p class="navbar-text navbar-right" style="float:right">Welcome <a href="user/{{user_id}}" class="navbar-link">{{username}}</a></p>
      </div>
    </nav>
footer.html
<div class="container">
<hr>
<footer>
<p>© Yxr 2016</p>
</footer>
</div> <!-- /container -->
<!-- Bootstrap core JavaScript
================================================== -->
<!-- Placed at the end of the document so the pages load faster -->
<script src="/static/bootstrap/bootstrap.min.js"></script>
</body>
</html>
2.注册
@route(r'/signin')
def signin():
    if ctx.request.method == 'POST':
        name = ctx.request.post('username')
        user = User.filter_one('username=%s', name)
        if user:
            return render('login.html', dict(error='用户名已被注册'))
        pwd = md5(ctx.request.post('password'))
        user = User(username=name, password=pwd)
        user.save()
        ctx.response.set_cookie('user_id', user.id, 36000)
        raise Redirect(302, '/')
http协议是一种stateless的协议,意味着每次请求和其他请求都是独立对待的,我们需要想办法记住用户,因此就需要借助cookie。注册成功后,会发送一个保存了user id的cookie。
3.主页
@route(r'/')
def index():
    if ctx.request.method == 'GET':
        u = check_login()
        return render('index.html', dict(user_id=u.id, username=u.username))
首先通过check_login函数检查用户是否已登录,如果已登录则显示主页。
check_login的定义如下:
def check_login():
    id = ctx.request.get_cookie('user_id')
    if id:
        user = User.get(id)
        if user:
            return user
    raise Redirect(302, 'login')
index.html
{% include header.html %}

<!-- Main jumbotron for a primary marketing message or call to action -->
<div class="jumbotron">
    <div class="container">
        <h1>Hello, world!</h1>
        <p>
            This is an example for using the simple web framework. It includes a message board where you can post everything you want. You can also reply to some message.
        </p>
    </div>
</div>

<div class="container">
    <!-- 评论列表 -->
    <div id="post-list">
        <div class="row">
            <input class="search form-control" placeholder="Search the content"/>
            <button class="sort btn btn-primary btn-sm" data-sort="publish_time">Sort by publish time</button>

        </div>
        <div class="list row"></div>
    </div>
    <!-- 评论列表的模板 -->
    <div style="display:none;">
        <!-- A template element is needed when list is empty, TODO: needs a better solution -->
        <div id="post-item" class="post-item">
            <div class="left">
                <span class="label label-default">
                    <span class="num"></span>
                    楼
                </span>
            </div>

            <div class="right">
                <a class="author" href="user"></a>
                <span class="publish_time"></span>

                <p class="content"></p>
                <p>
                    <button type="button" class="btn btn-default btn-xs">reply</button>
                </p>
            </div>

        </div>
    </div>
    <link rel="stylesheet" href="static/css/main.css">


    <!-- 编辑框 -->
    <form action="post" method="post">
        <!-- 加载编辑器的容器 -->
        <script id="container" name="content" type="text/plain">Type here...</script>
        <button type="submit" class="btn btn-success" style="margin-top: 10px;">Post</button>
    </form>
    <link rel="stylesheet" href="static/umeditor/themes/default/css/umeditor.css">
    <!-- 配置文件 -->
    <script type="text/javascript" src="static/umeditor/umeditor.config.js"></script>
    <!-- 编辑器源码文件 -->
    <script type="text/javascript" src="static/umeditor/umeditor.min.js"></script>
    <!-- 实例化编辑器 -->
    <script type="text/javascript">
        $(function(){
            window.um = UM.getEditor('container', {
                /* 传入配置参数,可配参数列表看umeditor.config.js */
                toolbar:[
                    'source | undo redo | bold italic underline strikethrough | forecolor backcolor removeformat |',
                    'insertorderedlist insertunorderedlist | paragraph | fontfamily fontsize' ,
                    '| justifyleft justifycenter justifyright justifyjustify |',
                    'link unlink | emotion image',
                    '| horizontal preview'
                ],
                'imageUrl':'/upload',
                'imagePath':'http://192.168.17.19:8888/'
            });


        });
    </script>
</div>
<script type="text/javascript" src="/static/js/list.min.js"></script>
<script type="text/javascript">
    $(function(){

        $.getJSON('/list',function(data){
            var options = {
                valueNames: [ 'id','num','user_id', 'author','ref', 'content', 'publish_time' ],
                item: 'post-item'
        };

            var values = data

            var postlist = new List('post-list', options, values);
        });

    });
</script>
{%include footer.html %}
时间线使用了list.js动态生成。
我们用get请求获得json数据,然后生成列表,get请求对应的处理函数为:
@route(r'/list')
def list():
    if ctx.request.method == 'GET':
        posts = Post.filter()
        for i in range(len(posts)):
            p = posts[i]
            p.num = i+1
            p.author = p.getAuthor().username
        return json.dumps(posts, cls=CJsonEncoder)
# customized json.dumps with date and datetime supported
class CJsonEncoder(json.JSONEncoder):
    def default(self, obj):
        if isinstance(obj, datetime):
            return obj.strftime('%Y-%m-%d %H:%M:%S')
        elif isinstance(obj, date):
            return obj.strftime('%Y-%m-%d')
        else:
            return json.JSONEncoder.default(self, obj)
dumps(date.today(), cls=ComplexEncoder)
4.编辑框
我是用的百度的umeditor(ueditor的mini版)。
编辑器外面的form和下面的提交按钮是自己写的,它返回的编辑框内容是字段名为"content"的html代码,为直接保存到数据库中。post地址对应的处理函数为:
@route(r'/post')
def post():
    if ctx.request.method == 'POST':
        u = check_login()
        content = ctx.request.post('content')
        post = Post(user_id=u.id, content=content)
        post.save()
        raise Redirect(302, '/')
图片上传
有了前面处理文件上传的函数,上传图片只需要检查一下文件的格式是否合法。
umeditor上传的图片的字段为upfile,显然我们还需要告诉umeditor上传图片的地址(imageUrl)和图片保存的位置(imagePath+url),在编辑器实例化的代码里我们使用imageUrl参数指定了图片上传的地址为/upload,该地址对应的处理函数函数如下:
@route(r'/upload')
def upload():
    if ctx.request.method == 'POST':
        uploader=FileUpload('upfile')
        file_ext=uploader.get_filext()
        allow_files =[".gif" , ".png" , ".jpg" , ".jpeg" , ".bmp" ]
        if file_ext in allow_files:
            path=uploader.save()
            info=dict(url=path,state='SUCCESS')
        else:
            info=dict(state='File format not allowed')
        return json.dumps(info)
FileUpload类的定义前面有讲过,我们判断了一下文件的后缀是否合法,然后就以原文件名保存了,如果相同文件名的文件已经存在了将会直接覆盖,在实际应用中,我们一般是用原始文件名生成一个随机串,然后保存在以当前日期时间为名称的文件夹下以防止覆盖。
该函数返回一个dict,包含两个键值对,url是文件保存的路径,也就是save_path+save_name,是相对于web应用的根目录,用来生成img的src;state是字符串表示的状态信息,成功为"SUCCESS",不能小写,其他则表示失败的原因,显示在上传框的左下角。
注意
- 文件上传出错,浏览器的控制台里显示:
HTTP request length 136000 (so far) exceeds MaxRequestLen (131072)- 原因:apache对上传的文件有限制,超过了就返回500
- 解决办法:在
<IfModule fcgid_module>里面添加如下指令:FcgidMaxRequestLen 20000000,然后重启apache服务器
- 使用非localhost访问无法加载图片
- 原因:umeditor返回的编辑框内容里的图片的src是包含主机地址的url,在编辑器实例化的时候使用imagePath指定图片url的前缀,如果使用'/'则umeditor会将当前访问网页的主机加到img的src前,假如我们通过localhost上传图片,则img的src的前缀就是http://localhost,别的电脑就无法加载。
- 解决办法:将imagePath设置成http://192.168.17.19:8888/
好了,我们的web应用就开发完了。
Todo
- 热启动 每次修改python文件都需要重启一下服务器才能生效,如果支持热启动能大大提高调试的效率
- jinja模板 我们的模板非常简陋,比如在include的时候就非常不方便,需要配合专业的模板,比如jinja,它支持继承
- 回复功能